If you’re still searching for ways to make remote and hybrid learning more efficient and engaging, we may be able to help. STEM experiences can still be a part of this new normal of instruction and, this week, we’re getting into more of how to make it happen. With help from our vendor partners, we’ve been working hard to make sure educators know how to adapt the tech tools they consistently rely on in the classroom into a home learning solution. Each one is different, but the opportunities to create remote STEM experiences, like coding, engineering, and design, in distance learning are there.
Virtual Dash Robot
Over the last few months, the creators of some of the top STEM tools in education have been working on making modifications to their offerings. This is especially true of the Wonder Workshop team, who have gone above and beyond to ensure that educators are able to teach coding and computational thinking remotely. During their Virtual Summit last spring, which was also held to help teachers with remote teaching, they announced that they would soon be launching their own virtual coding environment so students could keep programming with the Dash from their homes. Known as Dash’s Neighborhood, this remote STEM solution makes a great tool for both students and teachers, allowing everybody to stay connected and, most importantly, allowing students to keep up with coding.
Dash’s Neighborhood is accessed through Wonder Workshop’s Class Connect program. Before the addition of Dash’s Neighborhood, teachers could use Class Connect to assign STEM challenges to students, keep track of who had completed assignments, and monitor and record student progress with coding. Now, they can also help students with actual coding when they’re out of the classroom. Since it might be challenging for educators to send each student home with a Dash Robot in remote and hybrid learning situations, this virtual coding option is the next best thing. Students can access the virtual Dash through Class Connect and try the same kinds of block coding they would normally do with the physical robot from anywhere!

Another great option for remote coding is the Dash Home Learning Bundle. Released last spring, this portable solution includes a Dash Robot and other materials for students to use at home. Most importantly, it also comes with the Class Connect licenses so that students can access the virtual coding environment. Just a couple of weeks ago, the Wonder Workshop team announced that students would now be able to access the same Dash’s Neighborhood on mobile iOS devices as well, making it more accessible as the school year begins! If physical coding and robotics lessons are on the table for you at the start of the school year, that’s great, but, if not, the Dash Robot coding simulator makes a fantastic second option for educators who want to make sure computer science education continues.
Virtual Root Robot
Like Wonder Workshop’s virtual coding solution, the iRobot Education team has created a virtual version of their Root robot as well! It’s also accessible online for remote STEM education and allows kids to keep coding even if they’re learning remotely. Normally, the physical Root is designed for students in all grade levels and paired with the Root Coding app on an iOS device. Using the virtual version, however, students can access all of the same features and get the virtual version of the robot, which appears right on their computer screen, to do the same actions as the real Root. Unfortunately, the one drawback is that the virtual Root can’t scale a whiteboard surface like the real one can! If making use of a hybrid model to start the school year, however, educators can show this feature in the classroom and then allow students to try some of the other coding techniques when they’re working at home.
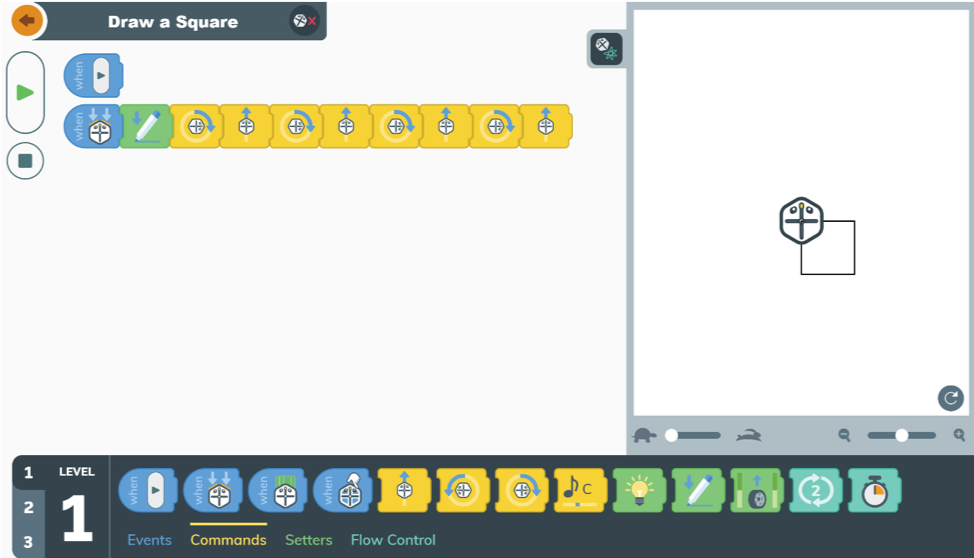
Students and teachers can access the virtual coding environment from the iRobot website. At the top of the page, there is a button that says ‘Code Now,’ which will bring you right to the online coding interface. That interface is the same one that students would use on an iPad to program the Root. They’ll see the three programming levels, which have come to be associated with the progressive kind of programming that Root allows for in the classroom. Level 1 is a fully graphical coding option, Level 2 is a hybrid option, and Level 3 is text coding. As always, it’s best for students to start out at Level 1 if they’re new to coding or new to the Root, but they should be able to pick up the skills fairly quickly and progress to the secondary levels. In each level, they have options for creating programs that include events, commands, setters, and flow control components.
Students can choose from suggested remote STEM activities, like drawing a simple square, or get creative and try to design their own. When constructed correctly, the on-screen Root will carry out the program and show students why it moved the way that it did. Students can also control the speed at which the virtual Root moves by toggling the control between the displayed turtle (slow) and hare (fast). Students can also switch between programming levels if they’d like—even if they’ve already started building a program. If moving from Level 3 back down to Level 2, for example, the code that they’ve already placed in the field will automatically translate to the language used in the new level selected, which makes for a great feature! We’d definitely recommend educators check out the virtual coding environment for Root as well as the Learning Library and premium content found on the iRobot Education website.

Tech Will Save Us
The Tech Will Save Us line includes a number of personal STEAM kits students can use in play-based learning. Most of the kits are designed to serve 1-2 students and can be used on a 1:1 basis in many situations. Since there are a good amount of pieces in each of their kits, it might be good for students to use them individually to avoid the need for sharing. Since many of the boxes are small as well, their kits also make great take-home options. While all of the Tech Will Save Us kits on our store are great options for STEAM learning, we’re focusing this week on the Creative Coder Kit. Using the components and curricular aspects associated with this kit, students are not only able to bring more excitement to MakerEd, they can try new ways of programming devices they invent as well!
The Creative Coder Kit is all about giving students the opportunity to invent interactive wearable devices. Unlike some of the other, less techy Tech Will Save Us kits, the Creative Coder Kit, as its name suggests, makes use of coding and technology. The Tech Will Save Us team has developed an online platform known as Club Make, through which students can create programs to use specifically with the Creative Coder Kit. The main pieces of the kit are the Snapband and accompanying velcro strap, which serve as their wearable. By pairing it with their computer, students can create tons of different custom programs online using block code and see how their Snapband lights up as a result! The coding software is very much visual and, using the blocks available to them, students can program their wearable to react to their movements!
To get started using Club Make in remote STEM lessons, students can click the link and select the Creative Coder Kit. They need to create a profile to get started, which only takes a minute. Once their account is ready to go, on-screen instructions appear and help them build their Creative Coder, including how to assemble all the parts, plug in the battery, close the case, and turn on the power. The next series of instructions covers how to move the Creative Coder to get it to react and how kids can play with it, including what they can do with the Activity app and the Bike Light app. Finally, the instructions cover how to code their inventions and then they’re ready to download the Bolt and Code software, which is needed for building programs. Once they have it installed on their computer, the coding can begin, giving students the opportunity to build programs using intuitive blocks, including lights, sensors, if’s, loops, and a whole lot more!

3D Printers
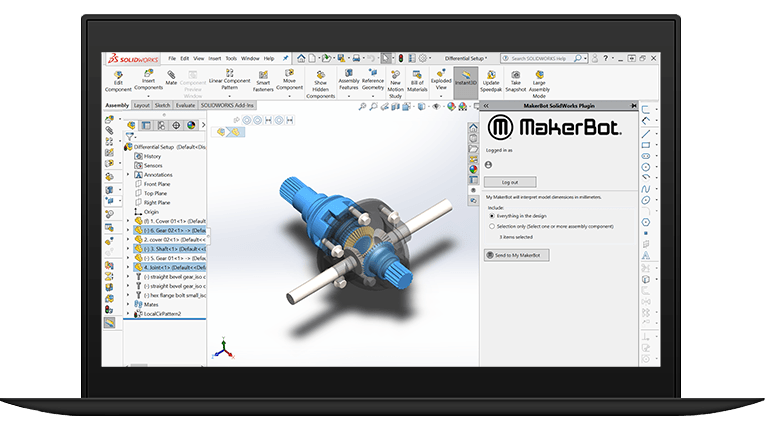
You might look at this next suggestion with sort of a confused stare at first, but let us explain why 3D printing is still a possibility even as students learn remotely. If you’re not familiar with 3D printing in education, it typically involves one or more 3D printers set up and paired with computers and software programs in a school library or makerspace. That’s the ideal setup situation, but students can still try 3D printing remotely. That’s because students don’t need to be with their 3D printer in order to create something—they can create the design themselves from anywhere, including at home. Using software programs designed for printers like the MakerBot SKETCH or LulzBot Mini, students can figure out what it is they want to print, create the virtual version of their design, and then send that prototype to their teacher or directly to the printer if possible.
The printer would likely remain at the school, but, as the design is transferred over to the printer and the 3D printing process begins, students could monitor its progress remotely. Depending on the printer they’re using, they might even be able to see a real-time video feed of their print. Now that you’re able to grasp a bit of an idea of how 3D printing in remote learning could potentially work, we’ll talk some more about the printers we’d recommend if you’re intrigued about this option for revolutionizing STEM learning and maker education. In terms of reliability, efficiency, cost, and ease of use, our top recommendations for K-12 3D printing almost always include LulzBot and MakerBot. We currently offer three LulzBot models: the TAZ Pro, TAZ Workhorse, and the Mini 2, which range from $1,500-$4,950 (a bit less with our Educator Discount). The MakerBot SKETCH might be the best MakerBot option for remote 3D printing, but the MakerBot Replicator could work out well, too.
The MakerBot SKETCH Bundle is new and comes with two MakerBot SKETCH printers, access to the MakerBot Cloud platform, MakerBot certification licenses, and hundreds of certified lesson plans for students to access. The lesson plans, in particular, can be very valuable in remote learning since they can give students new ideas for things they might want to print or potentially for prints that could be used to help in some way during the pandemic or school closures. With the Cloud software, teachers can manage student project submissions and queue up print jobs once printers become available. As for LulzBot, it’s not as conducive to remote STEM, but still possible. Students may need to be at the school to send their design to the printer, but they can return home while it prints. Or, if their teacher is at the school, they can submit the design to the printer for the student—either way, it’s still possible to keep this intriguing aspect as part of STEM education during this uncertain time.
Some Other Suggestions
As long as you’re creative and committed, it’s possible to use a lot of the same STEM tools you’d normally use in the classroom in remote instruction. We’ve narrowed down our favorites and put them in our Hybrid and Remote store category, but there are too many to list in this blog post, so, for this final section, we’ll talk about just a few more. For at-home engineering, for example, some of the options we’d recommend are the Edison Robot, Engino kits, E-Blox kits, NAO Robot virtual version, and KEVA kits. The Edison, for example, has a LEGO-compatible top and bottom surface, allowing students to build and customize robots to their specifications. As for Engino, there are a bunch of small, affordable kits that focus on different engineering concepts, like levers, inertia, pulleys, and inclined planes. Finally, E-Blox serves as a combination of engineering and circuitry while KEVA offers students no-tech-needed ways to design and build wooden structures.
If drones are something you were hoping to explore this year, the Tello EDU packs remain viable in distance learning. Single units can be sent home with students and programming them can be done at home as well. The Tello EDU classroom kits also come with enough charging cables to be sure they don’t run out of power if teachers break them up for students to use them at home. The same goes for the 3Doodler kits—they’re individualized or come in class packs that can be broken up and distributed accordingly. If students have cables for recharging the pens, that’s ideal, but they can use them for as long as the batteries last and design their own 3D structures at home, bringing new, hands-on relevance to almost any academic subject—remote on in-person.
Finally, students can use some of the smaller littleBits kits independently and transition from the classroom to the home. Ozobot also remains a solid option since students can easily transport the robot, the markers, and paper needed for screen-free color coding, but also access OzoBlockly online if they would like. If you’re looking for easy transport, that applies to the Sphero Mini and BOLT as well and the possible activities for each of those are extensive—plus, BOLT’s can be charged remotely. And, last but not least, the Thames & Kosmos kits make great independent STEM tools for students and the wide variety of their offerings allows kids to learn about tons of different science topics. It all comes down to what you’re most comfortable with, but, if you want to try to keep STEM in your curriculum despite using a remote or hybrid model, it can be done and using the right tech tools can help! If you’d like to learn more about how we can help, we encourage you to get in touch.
For the latest EdTech, STEM, and 21st century education news, follow us on Twitter and Instagram. Like us on Facebook, too, or sign up for our newsletter for our latest product announcements and offerings. If you have an idea for an Eduporium Weekly theme, send us a message on social media or comment below.


