The Matter and Form 3D scanner is a tool well suited for older students who want to bring more complex objects into their virtual toolbox quickly and easily. In this hands-on edition of our Eduporium Experiment, we're starting with the imaging resolution within the Matter and Form 3D scanner. We’ll also cover some of the most important information that students and educators need to know for enhancing their makerspace experiences, and help you discover some of the most useful nuggets you need to know, including the light levels and conditions and materials that are most effective for different learning environments.
Materials
- The Matter and Form 3D scanner
- A Windows/macOS computer with the MFStudio software installed
It's downloadable and works on Windows 7+ devices or with macOS 10 and above - A group of common objects for scanning
Your objects don't need to be uniform but should fit all of the general shape and color guidelines provided by the Matter and Form team. This means they should each have a maximum height of 25 cm, a maximum diameter of 18 cm, and a maximum weight of 3 kg.
- A pair of folded glasses
- A small building block
- Keys on a keyring
- A coffee mug
Procedure
- Set up and plug in the Matter and Form scanner using the included power cord. Ensure that you have several different objects that meet the detailed specifications from the materials list and those that are easy to tell apart. Now, turn on the scanner.
- Connect your scanner to your computer and run the calibration cycle. For more information on how to download the Matter and Form software or to set up a new scanner, check out the website or the PDF copy of the instruction manual.
- Begin scanning your objects starting with the building block.
- Place the item on the center of the scanning plate.
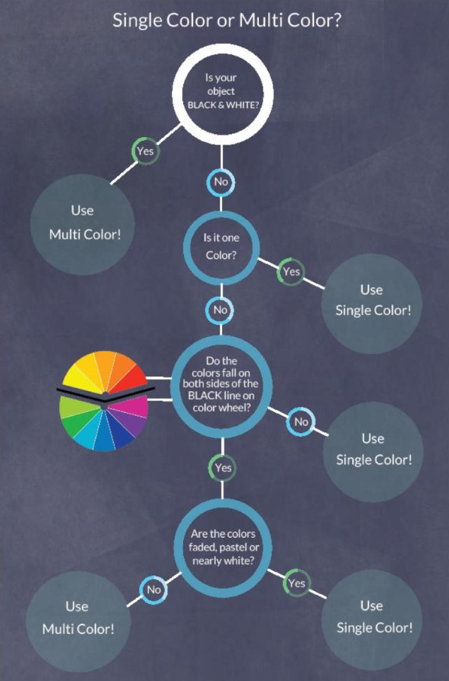
- Choose between using a single-color scan or a multi-colored scan depending on the object you're scanning. Use this guide for further information:

- Looking at the camera feed, position the object so that the laser line passes over the lightest colored area. Click the ‘confirm lightest color’ prompt.
- Looking at the camera feed, position the object so that the laser line passes over the darkest colored area. Click the ‘confirm darkest color’ prompt.
- Begin scanning the item using the default settings. This might take up to 30 minutes per item but can take as little as two minutes.
- Rotate the item on the scanning plate as needed to ensure that each side gets to face your camera at some point while scanning. To do this, use the combine tool located on the dashboard.
- Save the completed scan of the item.
- Repeat the process from Step 3 with a different material on this list. Make sure you complete scanning each item even if the models don’t clean correctly in the software. These errors will drive your analysis.
- Clean the saved scans, according to the instructions included in the Matter and Form manual.
Questions
- Do you think this block could interface with similar building blocks if it was printed? Why or why not?
- Are the lenses visible in the scan? How can you ensure the lenses can be seen on the scan?
- For the building block, are all of the sides of the building block visible in the virtual model?
- Does your scan of the mug seem to be watertight? Are there any holes in the mug?
- Is the scanner able to compile all different scans of the keyring? Why or why not?
- Is the interior of the mug fully formed? Does it have strange sloping shapes?
- What’s the smallest detail you can pick out from the building block?
Reflection
By answering the above questions and trying to scan different types of objects, you probably learned some of the most important rules when using the Matter and Form 3D scanner. Small, single-colored objects, like those building blocks, are easy to scan, but those objects that have large internal spaces, like a mug, often present issues when compiling. Clear and translucent surfaces, like the lenses on a pair of glasses, will not appear at all in the scans. The Matter and Form team recommends you cover these surfaces with masking tape to ensure they’re picked up by the scanner. The keyring is easy to scan at first but, when you move it around, it changes shape. For future scans, you should try to put moveable objects, like the keyrings, into a clear container, so you can move the entire object without changing its shape.
To learn more about the Matter and Form machine or to grab one of your own, visit our store. Make sure to check out all of our other makerspace tools as well, including 3D printers and CNC machines. If you have any questions about the Matter and Form scanner, feel free to get in touch with us and be sure to follow us on Twitter (X) and Instagram to keep learning more about the best tech tools for STEM education.


