
As we reckon with the reality of our changing climate, ecological education (EcoEd) becomes even more of a priority. Educating the next generation is the first line of defense against climate change. But with all the other tasks teachers have on their plates, finding time to talk about the environment is daunting. After all, students can’t become functional citizens without knowledge of mathematics, history and government, and more. That’s why we love STEM kits that come ready-made for teachers to integrate directly into the classroom, like Forward Education's Climate Action Kit.
The Climate Action Kit comes with everything a teacher needs, from hardware to curriculum-aligned lessons and step-by-step tutorials. This all-in-one learning solution makes it easy for educators to bring purpose-driven STEM into their classrooms. With the Climate Action Kits powered by micro:bit, students explore the intersection of technology and environmental issues by building and coding prototypes of green energy solutions. They can use the sensors included in the kit, such as sonar, touch, solar, and moisture sensors, to gather data and develop solutions to real-world problems.
The Basics of the Climate Action Kit
The Climate Action Kit comes in a compact green box with all the robotic components, building blocks, and sensors necessary to complete several climate projects. To get started using them, find the voucher code on the side of your kit. It’s easy to sign up and enter the code on the Forward Education website, and once logged in, you’ll be automatically enrolled in a few starter lessons. Before we get into following those lessons, though, let’s look at the components that come in your new kit.
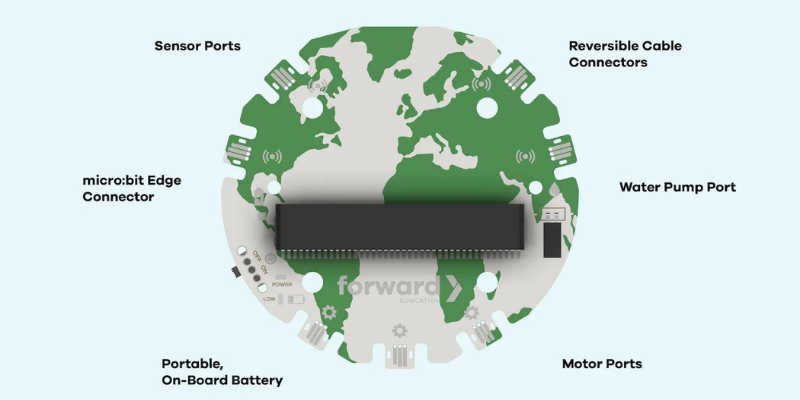
All of the blocks and sensors in the Climate Action Kit connect to the central Breakout Board (below). Like a spine, the Breakout Board sends code from its micro:bit “brain” to the various robotic components (the limbs). The whole operation draws power from a rechargeable onboard battery (the heart). It’s important to note that the kits don’t include the required micro:bit—you’ll have to buy micro:bits separately or use an existing collection. Once you have a micro:bit, though, a whole ecosystem of projects opens up.

Students can use the micro:bit to power many combinations of components. Each sensor or motor uses a reversible cable to connect to the Breakout Board’s ports. The building blocks can attach to each other or to the Breakout Board by simply snapping them together. Students can combine the blocks and robotic components to form traditional roving robots, like a model of an electric vehicle, or interactive models, like a solar panel prototype. Depending on the model, students will use the Climate Action Kit’s parts in different ways, allowing for flexibility and creativity in the design process. Additionally, the Climate Kit blocks are compatible with other plastic bricks like LEGO, allowing students to incorporate existing building materials into their projects.
Getting Started with the Climate Action Kit
First, familiarize yourself with the Breakout Board. Use the on/off switch to turn it on and look for the nearby light. If the light is red, you’ll need to charge the board using the micro USB port; if the light is green, you’re ready to go! Be sure not to remove the plastic cover on the back of the board—this protects the battery. Next, connect your micro:bit to the bar across the board. The numbers and letters on the micro:bit’s ports (0, 1, 2, 3V, GND) correspond to the labels on the Breakout Board, so line them up, insert the micro:bit into the board’s groove, and press it into place.
To connect a robotic component and start building projects, find one of the reversible cables in the kit and connect it to any of the board’s seven ports. Each port has a symbol that corresponds to one of the different types of components. The sensing symbol (a dot surrounded by curved lines) indicates sensors, while the gear symbols indicate motors. If you look at the robotic components, you’ll see that the same symbols appear on them. Note that you can only connect sensors to sensor ports and motors to motor ports.
The rest of the connection process is extremely flexible, since the reversible cables allow you to plug in components without worrying about them being upside-down. Once you've plugged them in, the Makecode coding platform automatically detects the attached Smart Sensor Components! Students can even daisy-chain sensors or robotic components together, attaching a line of parts outward from the Breakout Board. Makecode will automatically locate and identify each connected component. Best of all, once your micro:bit is connected to a computer, virtual versions of all attached components will show up in the online workspace.
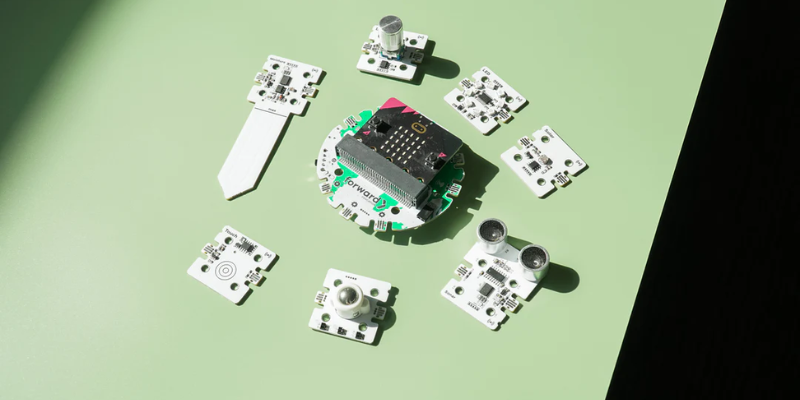
The Sensors and Robotic Parts
Using the Climate Action Kit’s sensors allows students to obtain a variety of information about the world, while the robotic parts enable them to add movement into their builds. Let’s dive deeper into the functions of each component. The touch sensor, as mentioned above, can be programmed to trigger various functions when touched. It can also tell how many times it is touched or the length of a touch, adding increased functionality. The solar sensor detects the amount of ambient light, so students could code the robot to act only at certain levels of light. The moisture sensor detects the amount of moisture in soil, while the infrared line sensors can identify and follow lines. The sonar sensor works similarly to how a bat uses echolocation, using ultrasonic frequencies to measure the proximity of objects and help the robot avoid obstacles. Students can program these sensors individually or in concert.
As for the motors, students have two options: two continuous motors and one positional motor. The plastic housing on the outside of the motors indicates their type. The continuous motors have a rotating circle symbol, while the positional motor has an angle symbol. Each type is suited for a different sort of project. Continuous motors are used for projects in which the motor should always be moving, such as when driving a robot. To facilitate these projects, the continuous motors come with two wheels that can be press-fit or screwed on. The positional motors, on the other hand, are for projects in which the motor should turn a component to a certain angle. Either motor can be connected to the Breakout Board in the same way as the sensors, with cable connectors. Just make sure you connect them to the ports with gear (motor) symbols.
Additional Accessories
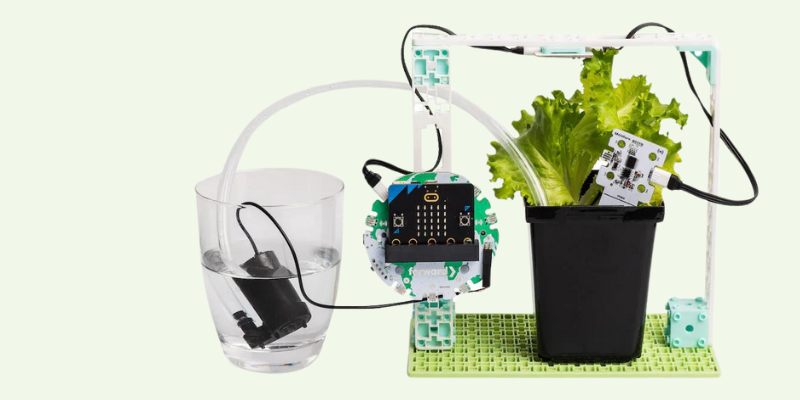
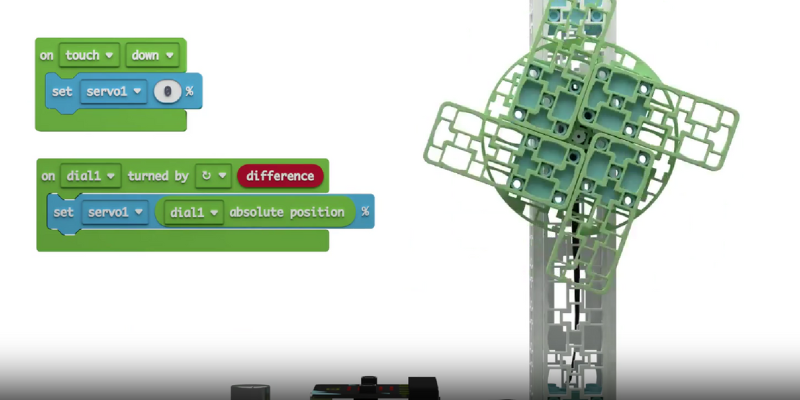
The kit also comes with an LED light that can be programmed in different colors and patterns—in addition to the micro:bit's onboard LEDs. There’s also a rotary dial and button, which can change the value or speed of a variable and trigger or stop an event. Finally, there's the water pump. Connect the water pump to the Breakout Board via the special port located across from the on/off button. Match the red (positive) and black (negative) wires to the associated pins on the Breakout Board. Then, connect the tubing to the water pump. Insert the pump into a glass of water and place the tube into the vessel where you want to move the water. But don’t put the pump away wet! Allow the pump to run outside of the water for a few moments to flush the lines. Let it fully dry before returning it to the kit.
Building Blocks
The Climate Action Kits’ sensors, robotic parts, and other components reach their full potential when combined with building blocks. The blocks are color coded: white for structural blocks, blue for connectors, and green for specialty pieces. The white blocks come in long-frame and medium-frame lengths. Some include slots for inserting a servo motor by threading the cable through the slot and pushing the motor into place. White pieces can be connected by blue pieces, which also come in multiple types. Corner and cube connectors join two white pieces, while back-to-back connectors join two parallel structure pieces. Finally, the round green pieces can serve as additional wheels or attach directly to the servo motor. All of the blocks fit on the larger base plate, which can serve as a foundation or frame. If any get stuck together, use the blue removal tool that looks like a guitar pick to separate them.
Forward Education Lessons and Activities
All the classroom-ready lessons are free to access with a registration for the Learning Platform. Educators must have a login, but they can use the share link to send students lessons without requiring them to log in. You’ll find the student share link on a green button to the right of the lesson overview page. The lessons span grades 3–12 and include a time estimate, the associated grade levels, and the curriculum alignment. Lessons also connect to NGSS, CCSS, or CSTA standards and can be filtered by grade level or topic (such as math, science, or technology). Each lesson also includes a tutorial video, though please note that the videos currently lack captions.
All lesson content is designed to be student-facing and promote self-paced learning. Students can go through the content at their own discretion, without having to follow along with a teacher. Inside of each lesson, students will find an overview with the “Big Idea” content and a “Take Action” project. The Big Idea section shows a specific climate change solution with a real-world example, while the Take Action section demonstrates how to build the related project. The latter section includes step-by-step instruction with pictures of the components they’ll need and how to attach them. Then, the Coding Concepts section introduces the coding blocks they’ll be using in the project. Students open Makecode and follow the coding tutorial, then return to the learning platform to continue building their new skills with additional challenges.
Helpful Hints
Although the lessons are created with student independence in mind, some kids still might get stuck. Helpful hints are available throughout the lessons to get them back on track. And when logged in, teachers can access special Educator Notes at the top of each section of the lesson. These notes aren’t visible to students, and they include further tips and links to additional information and resources. If students need extra help, teachers can use the Educator Notes to guide them through the material. They’ll also find connections to the UN Global Goals, demonstrating the importance of lessons like Powering the Future with Wind Energy, Smart Farming with Automated Watering, Harnessing the Sun’s Energy with Solar Panel Tracking, and more!
Coding with the Climate Action Kit
To code with the Climate Action Kit, students use the Makecode platform for micro:bit. Made by Microsoft, Makecode is a drag-and-drop block coding platform that’s perfect for introducing kids to coding. Since the Climate Action projects are powered by the micro:bit, Makecode for micro:bit is connected to each of the online lessons. To complete the lessons, you’ll first need to add the Forward Education extension to add the relevant commands to the coding options. If you’re starting with a Coding Tutorial on the Forward Education Learning Platform, the extension will be added automatically. However, you can also add the extension manually by searching “Forward Education” in the Makecode extensions drawer.
When going through a lesson, students will be automatically redirected to Makecode when they reach the Coding Tutorial section. Using the Coding Tutorial limits the drawers and blocks in Makecode to only those needed for that specific project, so students won’t get confused by the amount of options. If they need further help, though, they can click on the lightbulb icon in the tutorial to view a hint. The hints show what the required blocks look like, so students can find them more easily in the drawers. When students have finished the tutorial, they can return to the Learning Platform in the original tab. Or, they can click the “Done” button to go to the full Makecode Coding Workspace.
Simulating your code
To see a virtual simulation of the code, students will need to connect micro:bit to a Breakout Board, then pair it in Makecode. To do so, first turn on the Breakout Board with the micro:bit connected. Then, use the USB cable from the computer to plug in the micro:bit. On the bottom left of the screen in the Coding Tutorial, click on the “Download” button. Click the three dots, then click “Connect Device.” You’ll see a popup window on which you should click “Pair.” Then, another popup will appear in the browser. Click on your micro:bit to connect. Once the micro:bit connects, it will appear on the simulator under the picture of the micro:bit on the Makecode screen. After debugging the code in the simulator, you can download the finished code to the physical micro:bit to watch projects play out in real life.
Once students have progressed beyond the tutorials, they can use the extension on its own to experiment. Just open Makecode, create a new project, and use the Climate Action Kit’s functions and commands from the extension you added previously. Students can now learn by trial and error while creating more personalized climate projects. The tutorials also limit the coding languages students can use, but when using only the extension, they can easily switch between block code, Python, and Javascript, depending on their experience level.
Some Final Tips and Tricks
The Climate Action Kit has plenty of handy features to make it easier to use—so many that we haven’t even covered them all! One of the most convenient is the built-in cable management. Openings in the blocks allow you to pass cables through, so you don’t have excess wire hanging around. The ability to daisy chain components, which we mentioned above, also means that robotic components don’t need to connect directly to the Breakout Board. This allows for more flexibility, since components and cables can be rearranged and added with ease. Students can even lengthen cables with the included cable extenders. Another feature we love is the ability to customize the kits. Use the butterfly clips to attach construction paper, cardboard, or other materials. Then, simply decorate and design!
Get a Climate Action Kit for your classroom!
Interested in creating responsible citizens of our environment and climate? Grab a Climate Action Kit Class Pack or contact us for more information. You can also follow us on Twitter/X and Instagram for the latest green STEM news, or subscribe to our newsletter for more product updates.