The Edison Robot is one of the best educational robots thanks largely to its affordability and versatility. Students can program the Edison in a variety of ways—via barcodes or three levels of coding. One of the most effective coding environments is the second-level hybrid coding language known as EdScratch. The EdScratch platform is built on a very detailed, block-based coding language with a vertical format. This means students can drag and drop the programming blocks they need for each section of their program and construct it in such a way that it runs chronologically beginning with the blocks on top. It's a great option for introducing students to coding but also serves as a foundation for robust computer science instruction.
EdScratch features a number of block categories and drag-and-drop functionality. Educators can use it in teaching computational thinking skills (among others) as students build programs to control their robot. It's based on the Scratch coding language, which was developed at MIT. The environment is very user-friendly and designed for students as young as 10 years old. Besides beginning to understand how to create purposeful programs, students can also explore some of the more challenging aspects of coding, such as changing the input commands within blocks and setting their own values for distance, time, and speed in order to totally customize their programs. Also, whereas the beginner-level EdBlocks coding environment is entirely icon-based, the Microbric team considers the EdScratch environment to be hybrid. This means that the code blocks have written words on them to indicate their functions.
Getting to know EdScratch.
Students can access the EdScratch environment directly through the web. All they have to do is search for EdScratch or type the URL into their browser (or simply head to the environment). There, they can also program the Edison to drive, illuminate its LEDs, and play sounds. Plus, using its built-in sensors, students can use EdScratch to make the robot react to different things, such as encountering an obstacle, hearing a clap, pressing a button, or following a line. The environment is very intuitive, making it ideal for even beginner coders. It's easy for students to figure out and they can begin using it as early as 10 years old. Once they get more comfortable, they can even make their own variables, loops, and operators to customize their programs further!
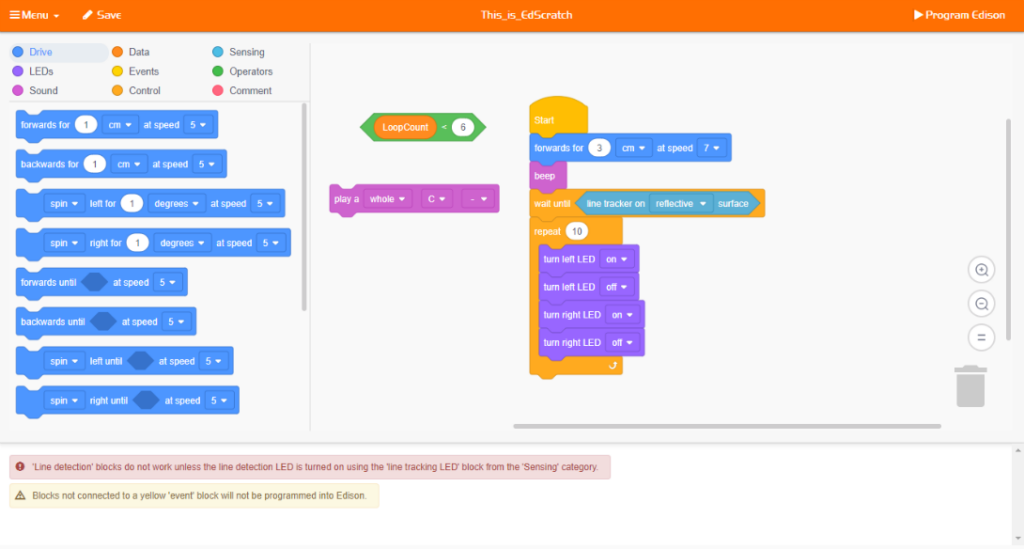
There are nine types of programming blocks within EdScratch—each represented by a different color. The most commonly used block type is likely to be the drive blocks, which are dark blue. With these, students can control the Edison's movements, its direction, the length of each movement, and even add custom parameters. With the purple LED blocks, they can create programs for controlling their robot's LED lights, including turning them on or off and sending infrared messages. Then, with the magenta colored sound blocks, they can program simple beeps or get the Edison to play musical notes, including setting the tempo or playing music in the background. Next, with the dark orange data blocks, students can create and manage variables once they get more comfortable with coding.
The more advanced coding blocks.
The next section is where students fill find the yellow events blocks. They can use these to add if-then statements to their programs, including programming their robot to do something if it detects an obstacle, if they press one of its buttons, if it detects a clap, and more. In the control section (light orange), blocks have more detailed if-then connections, allowing students to incorporate loops and wait blocks. Then, the final three block categories are more advanced and possibly better suited for older students or more experienced coders. The sensing section (light blue) includes blocks for activating and utilizing its built-in obstacle, clap, line tracking, or IR sensors. The operators section (green) includes blocks for incorporating math and equations and, finally, the comment section (pink) contains one block with which students can enter their own comments.

Another wrinkle to EdScratch is the built-in bug box, which automatically searches for errors in the code students create. Warning messages appear in the box when needed, allowing students to find bugs in their code and make edits. Yellow messages indicate that they can still download the program without resolving the issue but, if there's a red message, students will need to address the error before downloading the program. This introduction to debugging helps create a more seamless eventual transition to more complicated text coding, like EdPy. Also, there's a list of all potential warning messages on the Edison site in case students need help deciphering one.
Programming the Edison using EdScratch.
To get started with actual programming, students can load a demo program from the menu section within EdScratch. Options for this include following a line, moving with music, bouncing in borders, and more—some of which are the staple functions of the Edison Robot. Starting with a demo also helps students test if their computer settings are correct for their Edison to “hear” downloads. The Edison is unique in the sense that it downloads programs via the audio jack on your computer. Remember, your volume must be all the way up and your sound enhancements must be off. Check out our Tips & Tricks blog for Edison for more technical tips. There are also a bunch of EdScratch tutorial videos you can watch.

If teachers are stuck wondering how to incorporate EdScratch into lessons, you’ll be pleased to find that the Microbric team has developed a teacher’s guide and a set of free EdScratch lesson plans. The teacher’s guide includes unit and lesson overviews, activity details, and an answer key for supporting the student activities. The lesson plans are ideal for students aged 10 and up and include worksheets and activity sheets within the six units. It's essentially a mix of structured and open-ended activities that students can use independently. In the first unit, for example, students must complete coding challenges that are more preparatory in nature but, by the time they reach Unit 6, they'll be ready for some open-ended projects.
Making the most of the teacher materials.
The lesson plans are very flexible, allowing educators to integrate them into coding instruction however it works best for them. When paired with EdScratch and the Edison Robot, students will learn all sorts of STEAM skills, including computational thinking as we mentioned and also debugging, problem solving, and planning. Within each lesson plan, you'll find both the student activity set and the teacher's guide to using EdScratch. The student set contains worksheets and activity sheets for students to use independently. There's a mixed of structured and open-ended activities but all include clear instructions, illustrations, and space for students to record anything they need to remember.
The teacher's guide includes lesson delivery suggestions and other helpful tips to ensure students maximize learning with the Edison. It makes the perfect complement to the student activity set with plenty of corresponding insights and information. The Edison Robot teacher's guide also includes an overview of each unit, an overview of each lesson, and secondary information so teachers can pass on the learning objectives, supply requirements, and troubleshooting tips for students. Also, if you have an EdCreate kit, students can adapt many of the lesson plans in these resources for greater interactivity and engineering connections.
Getting started with the Edison Robot.
The Edison Robot is available in a variety of kit sizes for all types of makerspaces and classrooms. You'll find everything from affordable single units to the Edison 30-pack on our store. Plus, the EdCreate expansion pack for Edison is also available for students who are ready to build more complex creations. If you have any questions about the Edison product line, feel free to get in touch. Follow us on Twitter, Instagram, and Facebook for more.


